How to Climb Mount Rainier in One Day
Mt. Rainier in Washington state is an impressive peak. Clocking in at 14,417 ft. (4394 m.) above sea level and with a prominence of 13,210 ft. (4026 m.), it has the greatest total elevation change from base to summit of any mountain in the lower 48 states. It’s truly an awesome mountain that many understandably hope to summit. And while there are many different routes and approaches to summiting, it’s quite possible to successfully summit and descend in a single push. If you prefer not carrying heavy loads and never stopping once you start, keep reading for everything you need to know to have a safe and successful single-push climb on this impressive peak. We have climbed the mountain in this style several times by different routes, and here are our key takeaways for having a safe and successful climb.

Also Check out The Ultimate Guide to Climbing Mount Rainier!
Time of Year
The climbing season on Mt. Rainier runs from May through September. Typically, climbing early in the season (May through June) means easier glacier travel and cooler, wetter weather with more snow coverage. This means fewer crevasses and easier route finding. However, fickle spring weather provides fewer weather windows, so it’s much harder to plan a successful climb unless you have a flexible schedule. Late-season climbs (July through September) are generally marked by more complex glacier navigation, sometimes to the point that the routes become impassable. For that reason, the beginning of June to the beginning of July usually offers a nice blend of good glacier conditions and stable weather. But, as you might have guessed, that makes June and July the peak season for climbing, so reserving permits early is key.
Permits
In order to climb the peak, you will need to acquire a climbing permit (aka Wilderness Permit) and pay a climbing recovery fee. The climbing recovery fee, which costs $52 for climbers 26 and over and $36 for climbers 25 and under, must be paid by each person in your party before you arrive at the park. The fee is good for the whole year and helps the NPS maintain the necessary infrastructure for climbers.
A climbing permit is necessary for all climbing parties as well, even when you plan on doing the route in a day and don’t plan to camp. The climbing permit is essentially your camping permit, so you only need to get one permit for your entire group. Be sure to reserve your campsites well in advance of your trip if you are going to be climbing during peak season (June through July). The NPS does offer walk-up permits on a limited basis, but it would be a huge bummer if you are denied an overnight permit after you already made the trip to the mountain.
Routes
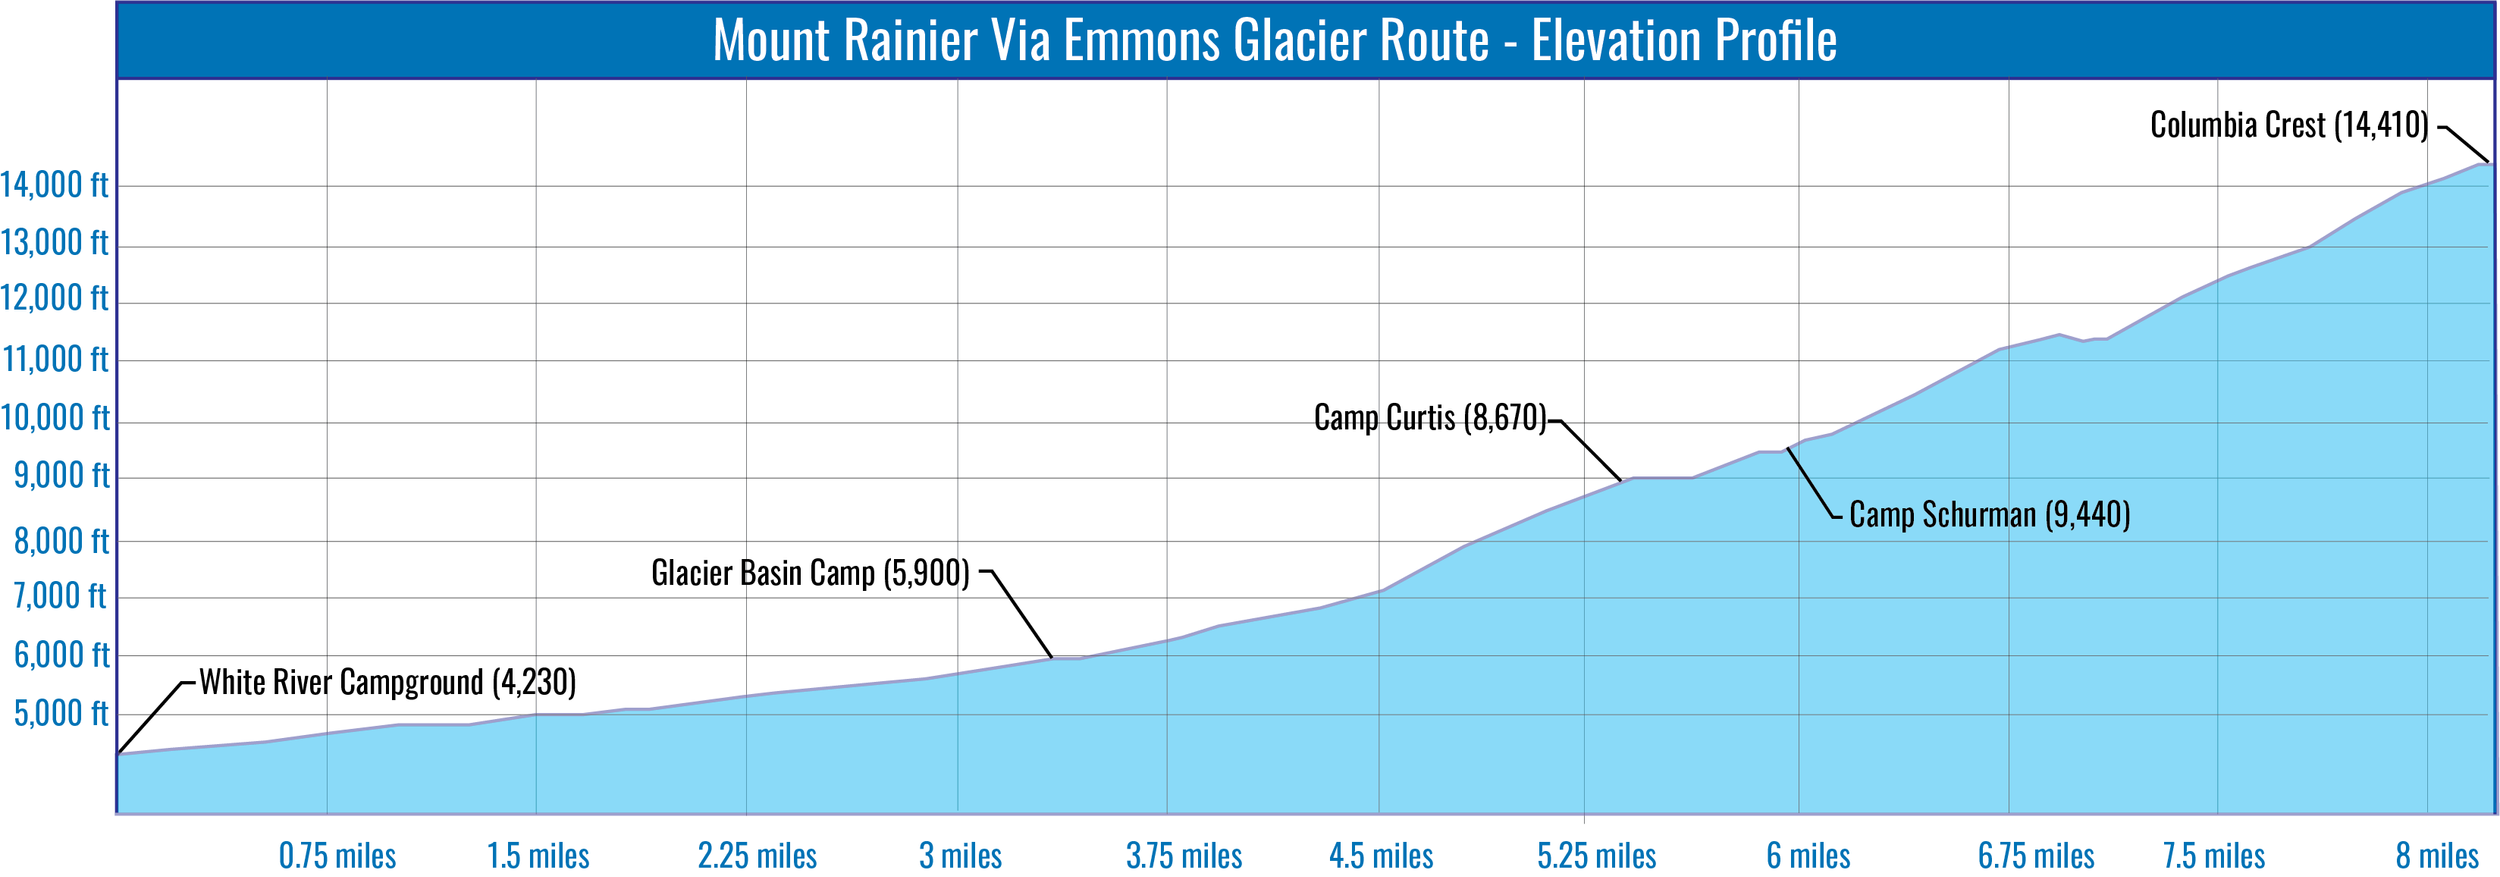
The Disappointment Cleaver Route offers the highest likelihood of success for single push climbers. Although this route is heavily guided, busy, and requires almost 9,000 ft. of elevation gain, it also offers easy route finding—which will minimize time spent on navigation—as well as an extra layer of safety by having other climbers around. Other popular single-day route options are the Emmons Glacier Route and the Fuhrer Finger Route. Because the Emmons Glacier route has about 1,300 ft. more elevation and is substantially longer than the Disappointment Cleaver, it’s not a good choice for most climbers. The Fuhrer Finger is another popular choice for single-day climbers because it offers a more direct line to the summit from Paradise Lodge, though it is substantially harder and requires much higher level mountaineering and ice climbing skills to complete safely. Check out the maps and elevations profiles below to get an idea of the Disappointment Cleaver and Emmons Glacier Routes.


Weather
Weather is one of the greatest unknowns while on Rainier, especially for the in-a-day climber who is traveling light. The size of the mountain means that it creates its own weather and can be impossible to fully predict. The storms on the mountain are incredibly violent—trust us when we say that you do not want to be caught out in them (we have. not fun.). Find the best weather forecast you can, and try to update it as often as you can. We like to use the point forecast feature through the National Oceanic and Atmospheric Administration (NOAA) website, though it is best to cross reference this with other forecasts as well (we like these from the University of Washington and the NPS). You can also talk with the climbing rangers to get their take on current weather conditions. Knowing how to efficiently navigate in bad weather is also an important skill and has saved our bacon more than once when caught in sudden low- and no-visibility conditions. Don’t attempt an in-a-day climb of Rainier if the weather forecast gives you any indication of storms, and if weather starts building while you are on the mountain, turn around.

Weather can move in suddenly on Rainier, making navigation impossible
Acclimation
Because of Rainier’s incredible prominence, acclimation becomes a very real problem for the would-be Rainier climber. Don’t take this lightly. A high level of fitness can help combat the effects of Acute Mountain Sickness (AMS), but plan on acclimating as much as you can prior to the climb. You can do this by hiking or climbing other peaks, spending time as high as you can on Rainier prior to climbing, etc. A great option for acclimation is to spend the night prior to climbing camping at the Cougar Rock Campground. This offers a comfortable night’s sleep at 3,100 ft. above sea level, and the convenience of car camping. While still not at the ideal elevation of acclimation, it’s better than nothing, especially if you are travelling from sea level (i.e. Seattle). As a general rule of thumb, we don’t even consider climbing Rainier in a day unless we have spent time above 10,000 ft. in the weeks leading up to the climb. If you start to feel the effects of AMS while on the route (or before leaving the parking lot), plan on turning around immediately or reassessing your situation. AMS will only get worse the higher you go, and thinking you can “walk it off” is a recipe for disaster.
Fast and Light
In order to be successful on a single-day climb of this magnitude, you must pack as light as you can while still maintaining a comfortable safety margin. This safety margin is highly personal and can only be determined through your own experience. Interested in the gear list we use when climbing mountains in a single push? Check out our Mount Rainier Gear List.

Ryan Leading some low angle ice on a single-day push on the Kautz Glacier Route.
To Ski or Not to Ski?
Using skis can be a good tactic to move faster during your climb, though their usefulness really depends on which route you decide to climb and your proficiency as a skier. For Emmons or Fuhrer Finger, skis are probably a good option if you have a lightweight setup and are a confident skier. Know what you are getting into, and how your abilities measure up before you decide to ski either of these routes. The DC route, as the name implies, climbs up a rocky volcanic ridge and is not skier friendly. You’d probably want to leave them at Camp Muir, negating much of their usefulness and making them much more work than they are worth. Check the current conditions and consult with the climbing rangers when deciding if skis are a good idea for your climb.
Start REALLY Early
This goes without saying, but in order to have the best chance of success you have to start really, really early. Leaving from Paradise at 10pm the night before just might be the ticket for success. Remember, leaving too early really isn’t a problem, but starting too late sure can be when factoring in weather and warming snow conditions. Check out our Ultimate Guide to Climbing Mount Rainier for more information on starting times, turn-around times, and hazards to think about when planning your start time.
Keep the Team Size Small
Having more people has pros and cons. On the one hand, it adds unnecessary complexity to a climb, but on the other, it can also add a layer of safety. We recommend team sizes of no more than 3 for a single-push climb. Solo climbing is possible, but it is not encouraged by the Park, and authorization in the form of a written letter from the NPS must be obtained.
Bring (and Eat) Lots of Food
Plan on carrying a lot of calories. As a general rule of thumb, we plan to eat 200 calories for every hour we plan on being on the route. This will vary person to person, but it’s a good starting point. Be sure to bring a variety of flavors and foods that you know you can eat no matter how you are feeling. As the altitude increases, you will be less likely to want to eat food, which is exactly when you must continue to eat in order to ward off the dreaded bonk. There is no water except for snow once you’re on the glacier as well, so be sure you have a system to melt and purify water.
Turn Around at the First Sign of Trouble
When climbing in this style, it’s best to be committed to turning around at the first sign of trouble. Weather changing? Go down. Feeling AMS coming on? Go down. Snow conditions softer than you would like? Go down. This is just one of the tradeoffs of climbing in this style: Climbing light and free means you won’t have the necessary resources to push through suboptimal situations.
Fitness
Obviously any post on climbing Rainier in a day wouldn’t be complete without talking about fitness. You must have the ability to move up steep snow and ice for upwards of 15-20 hours. As such, we recommend a combination of endurance training with some strength work to supplement your training for a single-push climb. If possible, plan other big days of similar durations and elevations leading up to your Rainier climb. This will help you gauge where you are physically and help mentally prepare you.

Overlooking Liberty Ridge from Curtis Ridge Camp. During this attempt, we encountered whiteout conditions on the lower glaciers that forced us to camp prematurely and ultimately resulted in turning around.
You may also like….


A single-day, human-powered adventure in the PNW.